
Friday, February 24, 2012
It's what's for lunch.
Sometimes, the answer to "What's for lunch?", especially on a Friday, doubly especially during February vacation week, has to be "Chinese Buffet".


Thursday, February 23, 2012
Layouts, layouts, and more layouts.....
We installed built in shelving in our living room, and we're finally at the point where we can unpack all of the stuff that's been boxed up for months, including our scrapbooks. It's so nice to have them on the shelves again! My birdhouse from yesterday's post is up on a shelf next to my desk area.
I brought down a giant stack of finished layouts from my scrap space that hadn't been put into the books, so I've been spending time tonight adding them in where they belong. I apparently had been saving up these layouts for a while because it was a pretty big stack, so I then had to sort them for my album themes.
I use mostly American Crafts Modern 12x12 albums, with a couple of WRMK albums thrown in. I use exclusively D-ring albums. I don't like the way post bound albums go together, I scrap completely out of order, and I love being able to add things where I want whenever I want, so D-ring albums work for me. Right now our albums include:
- Celebrations
- Hayden
- Family and Home
- Learning (school/education)
- Perrin
- Travel
- Wedding
I'll be adding a Disney album to that soon enough!

I Spy a Steampunk Birdie
I have to say, I really do love the steampunk genre, and I have since long before there was steampunk officially, back when William Gibson and Bruce Sterling mixed Victorian elegance and mechanical computers in The Difference Engine. Anyhow, I've blogged before about how Girl Genius is one of my favorite webcomics, and when I discovered Graphic 45's Steampunk Debutante paper collection, I nearly swooned as if I were wearing a corset.
I've been playing around with a lot of the papers, most of which have some stunning graphics that make great focal points (such as the tag I posted yesterday). However, this project uses paper from this collection more as background. The birdhouse itself I picked up from a dollar bin at Joann Fabrics. I painted it white and then put a layer of Distress Crackle Paint in rock candy over the top to give it a cracked texture. I used one G45 paper for the roof, and another cut into a grassy fringe around the base.
The birdie himself is a stamp by Graphic 45 for Hampton Arts. I love his glasses! The propeller is made from leftover electrical wire from one of my husband's home projects. The gears are an SVG file that I downloaded from The Free SVG Blog and cut on my Cricut. I used a few other bits from my stash to finish it off, including some copper swirl clips and you can't have a proper steampunk house without some steam!

I've been playing around with a lot of the papers, most of which have some stunning graphics that make great focal points (such as the tag I posted yesterday). However, this project uses paper from this collection more as background. The birdhouse itself I picked up from a dollar bin at Joann Fabrics. I painted it white and then put a layer of Distress Crackle Paint in rock candy over the top to give it a cracked texture. I used one G45 paper for the roof, and another cut into a grassy fringe around the base.

The birdie himself is a stamp by Graphic 45 for Hampton Arts. I love his glasses! The propeller is made from leftover electrical wire from one of my husband's home projects. The gears are an SVG file that I downloaded from The Free SVG Blog and cut on my Cricut. I used a few other bits from my stash to finish it off, including some copper swirl clips and you can't have a proper steampunk house without some steam!

Wednesday, February 22, 2012
Graphic 45 Corset Tag
Just a fun little tag using an image from Graphic 45 paper from the Steampunk Debutante collection.


Sunday, February 19, 2012
Basic Coloring with Copics

I've been playing around with my Copic Markers lately coloring stamped images. I love that I can customize the stamp design to whatever it is that I'm working on, coordinating colors or themes, etc. To create the card, I used papers from Graphic 45's Tropical Travelogue line, which is so luscious. I can't wait to get some of my Hawaii pics scrapped with this paper. In this post, I'm going to describe how I created the colored images for this fun card.
I first stamped the image that I wanted to color several times onto Strathmore Bristol paper. This is a heavyweight paper that can handle the "juiciness" of the Copic markers. If you really saturate the paper, it will bleed through, so I recommend using a craft mat under your paper to protect your work surface. When I'm using Copics, I stamp my images using Ranger Distress Ink. I stamp the image multiple times (in case I screw up and want to start over), and then let the ink dry for several minutes so it doesn't streak or bleed once I start coloring. The stamp I used is from a set by Graphic 45 for Hampton Arts that I purchased at Michael's. The stamped image is about 3" tall and about 1" wide.
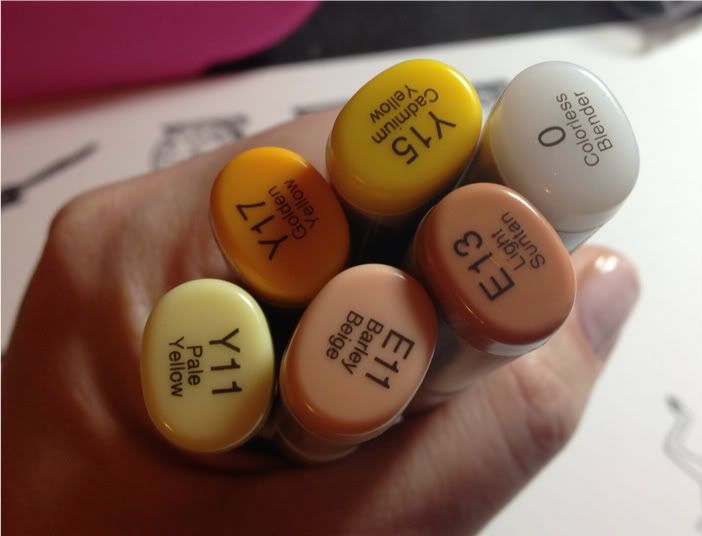
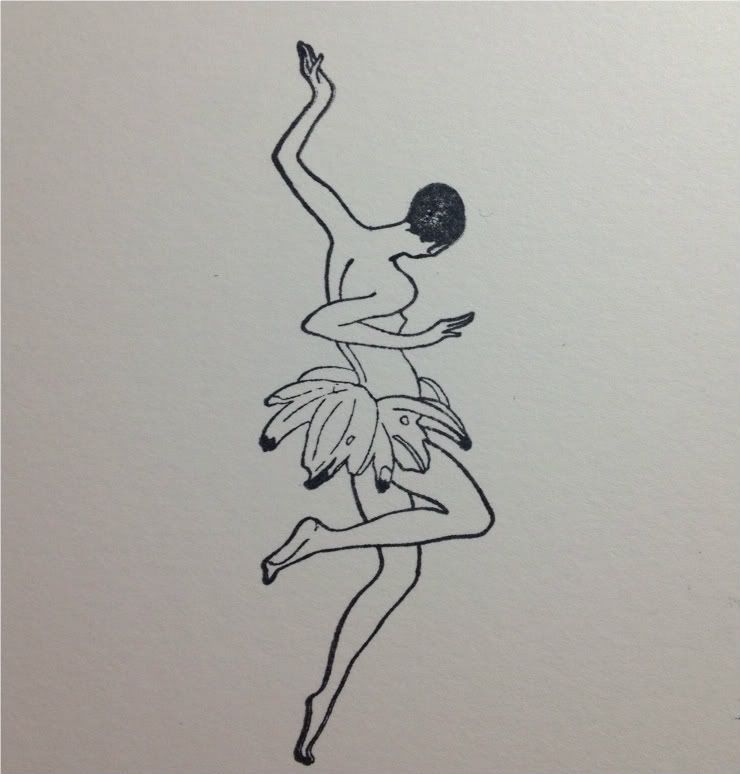 This image has two parts that will need to be colored: The skin tone and the bananas. I chose the markers you see here for my example, but for the actual card I created several combinations of skin tones. Each one uses two "E" shades that are in the same family.
I began by using Y11 (Pale Yellow) to fill in the entire banana area, using circular swirls to saturate the paper and the tip of the pen to reach tight areas.
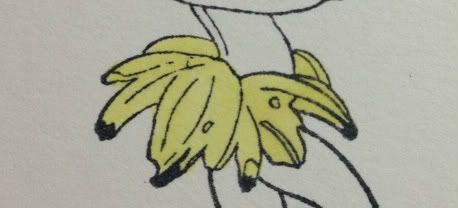
I then used Y15 (Cadmium Yellow) and Y17 (Golden Yellow) to draw lines on the undersides of the bananas or where there would be shadows. I used Y15 more liberally than Y17.

I then went back over the whole banana area with Y11 to soften and blend the deeper colors.

Next, onto the skin tones. For this example, I used E11 (Barely Beige) and E13 (Light Suntan). I began by filling in the entire body shape with E11, then using E13 to create a shadow line on the back of the body and where there were overlaps.
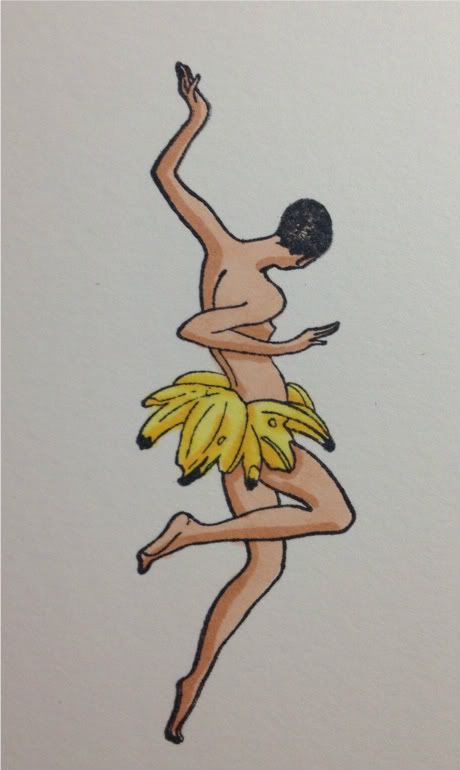
This on its own gives an interesting effect, but I wanted to soften the gradation a bit, so I used E11 to blend the darker E13.
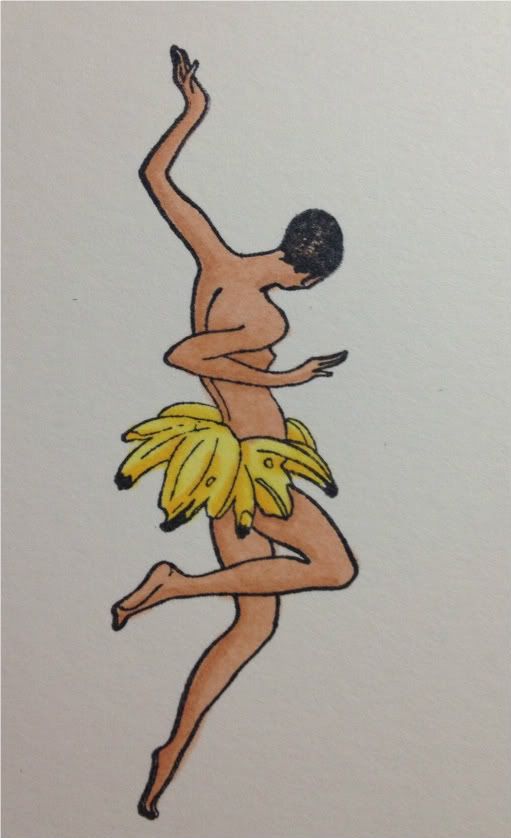 Finally, I used the Colorless Blender to touch up some areas where I went outside the line. The Colorless Blender is not an eraser, but it acts as a thinner and moves the excess ink away, making your mistakes less noticeable. I then trimmed this image down to use on my card.
Friday, February 17, 2012
Be a Brave Girl and Heal Your Soul

I don't quite know where to start when it comes to Melody Ross, Brave Girls Club, and Soul Restoration. All three of these things have provided such joy, support, love, exploration, uplifting, and so much more.
Melody Ross has been a fixture in the world of scrapbooking for a long time, through her Chatterbox brand and through more recent partnerships with GCD and others. She is an absolutely gorgeous woman, but once you've started reading her blogs and watching her videos, you learn that she is a perfectly real and fragile human being just like all of us. She has a great family and lives in rural Idaho where the scenery is just amazing. However, her story is full of tragedy, heartache, and rebirth. I hope that I do get to meet her someday, like some of my Brave Girl friends have, and hug her and say thank you. More on why I have so much to thank her for later in this post.

Melody and her sister Kathy started Brave Girls Club for women who needed to be encouraged, to find like souls, and to create. You can sign up to receive Daily Truth emails, which are little bits of wisdom that have the gift of managing to speak to me in important ways every day. Brave Girls Club also includes an array of classes that include exploration of the self and of art. Their very first offering was Brave Girl Camp, where you could spend a few days with a few women at a lodge in Idaho, making art and learning about yourself.
Soul Restoration was the very first Brave Girl online course, and I was blessed to take the very first session of it in January 2011. I even remember when I found out about it via email or the web or something, and I thought, "I need this", and I registered right then and there. Soul Restoration (and now there are two parts, SR1 and SR2) absolutely and positively changed my life for several reasons:
- It helped me to think about myself in ways I hadn't thought of.
- It helped me to clean out my "soul house" and focus on what is important.
- It introduced me to art and paper crafting techniques I didn't know about or was afraid to try.
- It helped me to get out of the rut I was in.
- It introduced me to a community of amazing women that I am still close to a year later. I love my Soul Glue Girls!

Tuesday, February 14, 2012
Pork Miso Hot Pot
My husband gave me the book Japanese Hot Pots by Tadashi Ono and Harris Salat, and it has been so fun to read. The recipes look amazing! I tried out a crab hot pot twice and it was delicious. One of the basics of hot pot cooking is the cooking vessel. I had been using a stainless steel dutch oven that I already owned, but it wasn't quite right. It didn't hold the heat that well or distribute heat as evenly as a thicker walled vessel would.
I then decided to purchase this enamel-coated cast iron dutch oven:
I did find the same model at Target, but the Amazon price is $10 cheaper, and with Prime membership shipping was free.
Tonight I christened the dutch oven with a recipe from the above book: Pork Miso Hot Pot. Here's what it looked like right when I added the pork:
 and again in my bowl.

Delicious, hearty meal!

Subscribe to:
Posts (Atom)